Manage team access
With Amplify Studio, team members with different job functions can collaborate on different aspects of a project deployed in Amplify. Studio developers can create accounts with admin or manage-only access to resources and invite team members to join via email.
Follow these instructions to add and manage team members and their access to a project.
To invite team members to access a project
- Sign in to the AWS Management Console and open AWS Amplify.
- Select your Amplify project with Amplify Studio enabled.
- In the navigation pane, choose Amplify Studio settings.
- On the Amplify Studio settings page, in the Access control settings section, choose Add team members.
- For Email, enter the email address of the team member to invite.
- For Access level, choose the level of access to grant the team member.
- Full access allows the team member to create and manage AWS resources.
- Manage only access allows the team member to edit app content and users.
- To email the invitation, choose Send invite. The team member receives an email with temporary credentials and a link to access the project in Studio.
To edit team member access or delete a user
- Sign in to the AWS Management Console and open AWS Amplify.
- Select your Amplify project with Amplify Studio enabled.
- In the navigation pane, choose Amplify Studio settings.
- On the Amplify Studio settings page, in the Access control settings section, select the team member to edit or delete.
- Do one of the following:
- Choose Edit. In the Edit team member(s) window, choose the Access level for the team member.
- Choose Delete. In the Delete users window, confirm the delete action.
Understanding how Studio manages user access
User pool
Studio manages user access using an Amazon Cognito User Pool in your account. You can invite up to 50,000 monthly users to Studio without cost.
Studio manages user access using an Amazon Cognito User Pool in your account, named:
- amplify_backend_manager_APPID.
IAM Roles
In order to give the Full access and Manage only groups the necessary permissions, Studio creates 2 IAM roles, named:
- USERPOOLID_Full-access
- USERPOOLID_Manage-only
Cognito Identity Pool
An Amazon Cognito Identity Pool is also created to vend AWS credentials that are tied to the Full access and Manage only groups, named:
- amplify_backend_manager_APPID
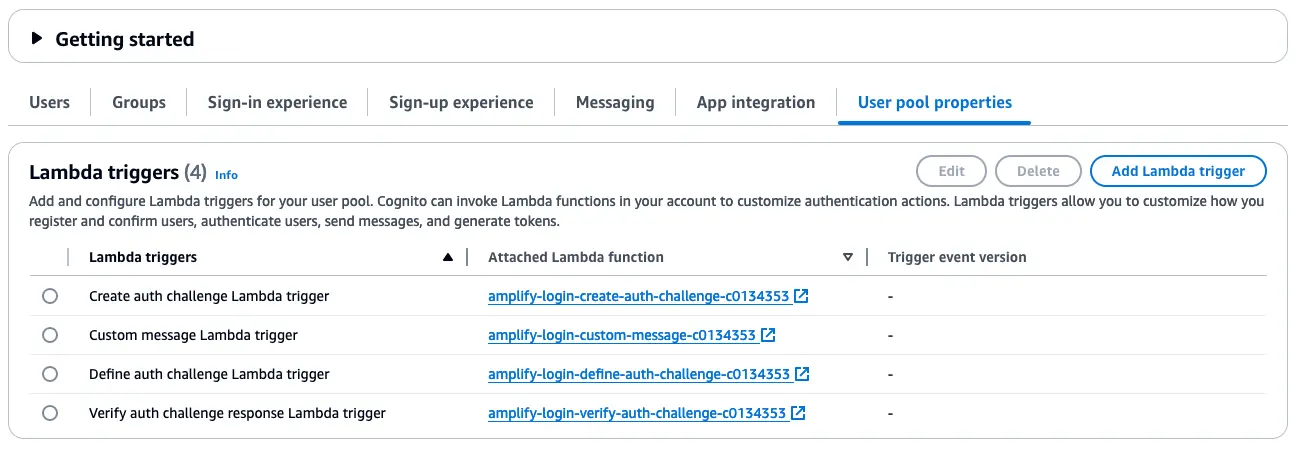
Cognito Lambda triggers
To provide a passwordless login experience from AWS Amplify Console to Amplify Studio, Studio creates 4 Cognito Lambda triggers associated with the above-mentioned User Pool, named:
- amplify-login-create-auth-challenge-SHORT_CODE
- amplify-login-custom-message-SHORT_CODE
- amplify-login-define-auth-challenge-SHORT_CODE
- amplify-login-verify-auth-challenge-SHORT_CODE
Troubleshooting
If your Studio application experiences any issues logging in or the resources have been deleted, you can re-create the resources by disabling and then re-enabling Studio for your Amplify Project on the Amplify management console.
- Sign in to the AWS Management Console and open AWS Amplify.
- Select your Amplify project with Amplify Studio enabled.
- In the navigation pane, choose Amplify Studio settings.
- Turn off Enable Amplify Studio.
- Turn on Enable Amplify Studio.
I am not authorized to perform an action in Amplify
If you receive an error that you're not authorized to perform an action, your policies must be updated to allow you to perform the action.
If you need help, contact your AWS administrator. Your administrator is the person who provided you with your sign-in credentials. See AWS managed policies for AWS Amplify for more details.
Updating Login Cognito Lambda triggers runtime
If you need to update the Cognito Lambda triggers runtime, you can do so by updating the Lambda functions triggers associated with the Cognito User Pool named amplify_backend_manager_<app-id>.
- Log in to the AWS Management Console, open the Amplify console and select your Amplify project with Amplify Studio enabled.
- Retrieve the App ID present on the overview page under the App name.
- Go to Amazon Cognito console, select User pools. Search for the user pool with the App Id. You will observe the app user pool with the naming format
amplify_backend_manager_<app-id>. - Select the user pool and go to User Pool Properties which should display the Lambda Triggers.
- For each lambda trigger, select the link specified in the Attached Lambda Function column. Note, If your lambda trigger is Verify auth challenge response Lambda trigger the function requires additional steps provided on Update verify auth challenge response Lambda trigger section.
- Select Edit runtime settings and change the runtime to Node.js 20.x from the drop-down options.

- Finally, select Save.
Update verify auth challenge response Lambda trigger
This function requires code change as Lambda with NodeJS 20.x use a newer version of aws-sdk.
- Go to Lambda Code Source and select
index.jsfile.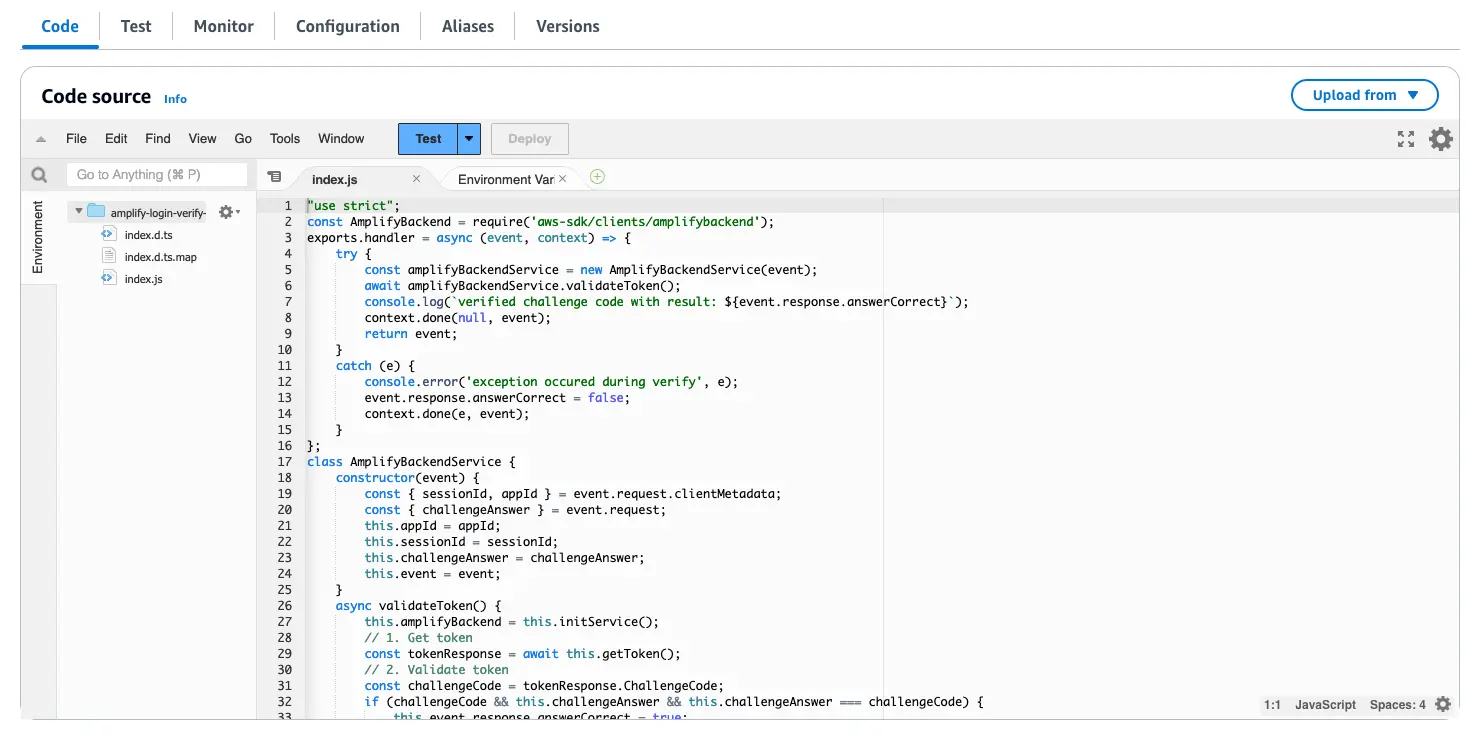
- Replace the contents of
index.jswith the following:
const { AmplifyBackendClient, GetTokenCommand, DeleteTokenCommand } = require('@aws-sdk/client-amplifybackend');
exports.handler = async (event, context) => {  try {    const amplifyBackendService = new AmplifyBackendService(event);    await amplifyBackendService.validateToken();    console.log(`verified challenge code with result: ${event.response.answerCorrect}`);    context.done(null, event);    return event;  } catch (e) {    console.error('exception occurred during verify', e);    event.response.answerCorrect = false;    context.done(e, event);  }};
class AmplifyBackendService {  constructor(event) {    const { sessionId, appId } = event.request.clientMetadata;    const { challengeAnswer } = event.request;    this.appId = appId;    this.sessionId = sessionId;    this.challengeAnswer = challengeAnswer;    this.event = event;  }
  async validateToken() {    this.amplifyBackend = this.initService();    // 1. Get token    const tokenResponse = await this.getToken();
    // 2. Validate token    const challengeCode = tokenResponse.ChallengeCode;    if (challengeCode && this.challengeAnswer && this.challengeAnswer === challengeCode) {      this.event.response.answerCorrect = true;    } else {      this.event.response.answerCorrect = false;    }
    // 3. Delete token    await this.deleteToken();
    return this.event.response.answerCorrect;  }
  initService() {    const amplifyBackend = process.env.ENDPOINT      ? new AmplifyBackendClient({          endpoint: process.env.ENDPOINT,        })      : new AmplifyBackendClient();    return amplifyBackend;  }
  getToken() {    return this.amplifyBackend.send(      new GetTokenCommand({        AppId: this.appId,        SessionId: this.sessionId,      }),    );  }
  deleteToken() {    return this.amplifyBackend.send(      new DeleteTokenCommand({        AppId: this.appId,        SessionId: this.sessionId,      }),    );  }}
exports.AmplifyBackendService = AmplifyBackendService;- Finally, select Deploy to save the changes.