
Nếu đang dùng bố cục dựa trên View, bạn có 3 lựa chọn chính cho
triển khai nút bật/tắt. Bạn nên sử dụng
Thành phần SwitchMaterial
trong Material
Thư viện thành phần:
<androidx.constraintlayout.widget.ConstraintLayout xmlns:android="http://schemas.android.com/apk/res/android"
    xmlns:app="http://schemas.android.com/apk/res-auto"
    android:layout_width="match_parent"
    android:layout_height="match_parent"
    android:padding="16dp">

    <com.google.android.material.switchmaterial.SwitchMaterial
        android:id="@+id/material_switch"
        android:layout_width="wrap_content"
        android:layout_height="wrap_content"
        android:text="@string/material_switch"
        app:layout_constraintEnd_toEndOf="parent"
        app:layout_constraintStart_toStartOf="parent"
        app:layout_constraintTop_toTopOf="parent" />

</androidx.constraintlayout.widget.ConstraintLayout>
Các ứng dụng cũ có thể vẫn sử dụng phiên bản cũ
SwitchCompat AppCompat (Mã nhận dạng thiết bị di động)
thành phần, như được minh hoạ trong ví dụ sau:
<androidx.constraintlayout.widget.ConstraintLayout xmlns:android="http://schemas.android.com/apk/res/android"
    xmlns:app="http://schemas.android.com/apk/res-auto"
    android:layout_width="match_parent"
    android:layout_height="match_parent"
    android:padding="16dp">

    <androidx.appcompat.widget.SwitchCompat
        android:id="@+id/switchcompat"
        android:layout_width="wrap_content"
        android:layout_height="wrap_content"
        android:text="@string/switchcompat"
        app:layout_constraintEnd_toEndOf="parent"
        app:layout_constraintStart_toStartOf="parent"
        app:layout_constraintTop_toTopOf="parent" />

</androidx.constraintlayout.widget.ConstraintLayout>
Ví dụ sau cho thấy
AppCompatToggleButton!
đây là một thành phần cũ khác có giao diện người dùng khác biệt đáng kể:
<androidx.constraintlayout.widget.ConstraintLayout xmlns:android="http://schemas.android.com/apk/res/android"
    xmlns:app="http://schemas.android.com/apk/res-auto"
    android:layout_width="match_parent"
    android:layout_height="match_parent"
    android:padding="16dp">

    <TextView
        android:id="@+id/toggle_button_label"
        android:layout_width="wrap_content"
        android:layout_height="wrap_content"
        app:layout_constraintStart_toStartOf="parent"
        app:layout_constraintEnd_toStartOf="@id/toggle"
        app:layout_constraintHorizontal_chainStyle="packed"
        app:layout_constraintBaseline_toBaselineOf="@id/toggle"
        android:text="@string/toggle_button" />

    <androidx.appcompat.widget.AppCompatToggleButton
        android:id="@+id/toggle"
        android:layout_width="wrap_content"
        android:layout_height="wrap_content"
        app:layout_constraintEnd_toEndOf="parent"
        app:layout_constraintStart_toEndOf="@id/toggle_button_label"
        app:layout_constraintTop_toTopOf="parent"
        app:layout_constraintBottom_toBottomOf="parent"/>

</androidx.constraintlayout.widget.ConstraintLayout>
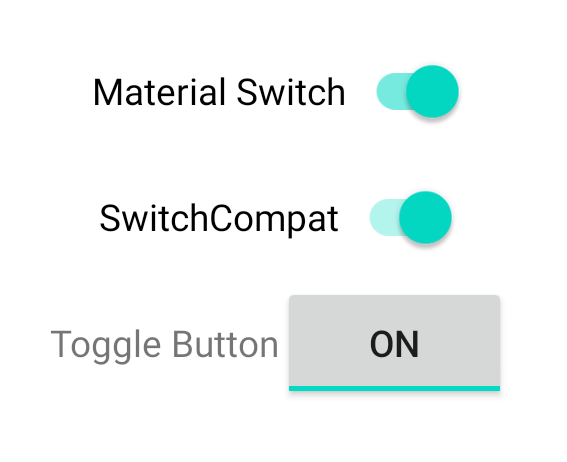
Ba thành phần này cung cấp hành vi giống nhau nhưng trông khác nhau. Chiến lược phát hành đĩa đơn
có sự khác biệt nhỏ giữa SwitchMaterial và SwitchCompat, nhưng
AppCompatToggleButton có sự khác biệt đáng kể:
Xử lý các thay đổi về trạng thái
SwitchMaterial, SwitchCompat và AppCompatToggleButton đều là lớp con
trên CompoundButton,
cung cấp cho chúng một cơ chế chung để xử lý các thay đổi về trạng thái đã đánh dấu. Bạn triển khai
một bản sao của
CompoundButton.OnCheckedChangeListener
rồi thêm đoạn mã đó vào nút, như trong ví dụ sau:
Kotlin
class MainActivity : AppCompatActivity() {
    override fun onCreate(savedInstanceState: Bundle?) {
        super.onCreate(savedInstanceState)

        val binding: SwitchLayoutBinding = SwitchLayoutBinding.inflate(layoutInflater)
        setContentView(binding.root)

        binding.materialSwitch.setOnCheckedChangeListener { _, isChecked ->
            if (isChecked) {
                // The switch is checked.
            } else {
                // The switch isn't checked.
            }
        }
    }
}
Java
public class MainActivity extends AppCompatActivity {

    @Override
    protected void onCreate(Bundle savedInstanceState) {
        super.onCreate(savedInstanceState);

        SwitchLayoutBinding binding = SwitchLayoutBinding.inflate(getLayoutInflater());
        setContentView(binding.getRoot());

        binding.materialSwitch.setOnCheckedChangeListener((buttonView, isChecked) -> {
            if (isChecked) {
                // The switch is checked.
            } else {
                // The switch isn't checked.
            }
        });
    }
}
CompoundButton.OnCheckedChangeListener là một giao diện phương thức trừu tượng duy nhất
(hoặc giao diện SAM) để bạn có thể triển khai dưới dạng lambda. Hàm lambda được gọi
bất cứ khi nào trạng thái đã đánh dấu thay đổi và giá trị của boolean isChecked
được truyền vào lambda cho biết trạng thái mới đã đánh dấu.