
WindowInsetsCompat 사용
앱에서 터치 키보드(
IME)
시스템 표시줄과 상호작용하는 방식을 보여줍니다. 또한 앱에서
WindowInsetsAnimationCompat 드림
소프트웨어 키보드가 열리거나 닫힐 때 원활한 전환이 이루어지도록 합니다.
기본 요건
소프트웨어 키보드의 컨트롤 및 애니메이션을 설정하기 전에 앱이 더 넓은 화면에 콘텐츠를 표시할 수 있습니다. 이를 통해 다음과 같은 시스템 창 인셋을 처리합니다. 시스템 표시줄 및 터치 키보드가 포함되어 있습니다.
키보드 소프트웨어 공개 상태 확인
WindowInsets를 사용하여 소프트웨어를 확인합니다.
표시됩니다.
Kotlin
val insets = ViewCompat.getRootWindowInsets(view) ?: return
val imeVisible = insets.isVisible(WindowInsetsCompat.Type.ime())
val imeHeight = insets.getInsets(WindowInsetsCompat.Type.ime()).bottom
자바
WindowInsetsCompat insets = ViewCompat.getRootWindowInsets(view);
boolean imeVisible = insets.isVisible(WindowInsetsCompat.Type.ime());
int imeHeight = insets.getInsets(WindowInsetsCompat.Type.ime()).bottom;
또는
ViewCompat.setOnApplyWindowInsetsListener 드림
소프트웨어 키보드 가시성의 변화를 관찰할 수 있습니다.
Kotlin
ViewCompat.setOnApplyWindowInsetsListener(view) { _, insets ->
  val imeVisible = insets.isVisible(WindowInsetsCompat.Type.ime())
  val imeHeight = insets.getInsets(WindowInsetsCompat.Type.ime()).bottom
  insets
}
자바
ViewCompat.setOnApplyWindowInsetsListener(view, (v, insets) -> {
  boolean imeVisible = insets.isVisible(WindowInsetsCompat.Type.ime());
  int imeHeight = insets.getInsets(WindowInsetsCompat.Type.ime()).bottom;
  return insets;
});
소프트웨어 키보드와 애니메이션 동기화
사용자가 텍스트 입력란을 탭하면 키보드가 제자리에 들어갑니다. 아래 예에 나와 있는 것처럼 화면 하단에 버튼이 표시됩니다
<ph type="x-smartling-placeholder">'비동기식'으로 라벨이 지정된 예에는 2012년 3월 31일의 기본 동작을 Android 10 (API 수준 29) - 앱의 텍스트 필드와 콘텐츠 제자리에 끼워 맞추는 대신 키보드의 시각적으로 부자연스럽게 느껴질 수 있는 동작이 있습니다.
Android 11 (API 수준 30) 이상에서는 다음을 사용할 수 있습니다.
WindowInsetsAnimationCompat: 앱 전환을 키보드가 화면 하단에서 위아래로 슬라이드됩니다. 이 '동기화됨'으로 표시된 예에 나온 것처럼 나타냅니다.
구성
WindowInsetsAnimationCompat.Callback 드림
뷰와 동기화해야 합니다.
Kotlin
ViewCompat.setWindowInsetsAnimationCallback(
  view,
  object : WindowInsetsAnimationCompat.Callback(DISPATCH_MODE_STOP) {
    // Override methods.
  }
)
자바
ViewCompat.setWindowInsetsAnimationCallback(
    view,
    new WindowInsetsAnimationCompat.Callback(
        WindowInsetsAnimationCompat.Callback.DISPATCH_MODE_STOP
    ) {
      // Override methods.
    });
WindowInsetsAnimationCompat.Callback에서 재정의할 여러 메서드가 있습니다.
즉,
onPrepare(),
onStart(),
onProgress(),
및
onEnd()
레이아웃이 변경되기 전에 onPrepare()를 호출하는 것으로 시작합니다.
onPrepare는 인셋 애니메이션이 시작될 때와 뷰 전에 호출됩니다.
애니메이션으로 인해 다시 배치되는 것입니다. 이를 사용하여 시작 상태를 저장하고
이 경우 뷰의 하단 좌표입니다.
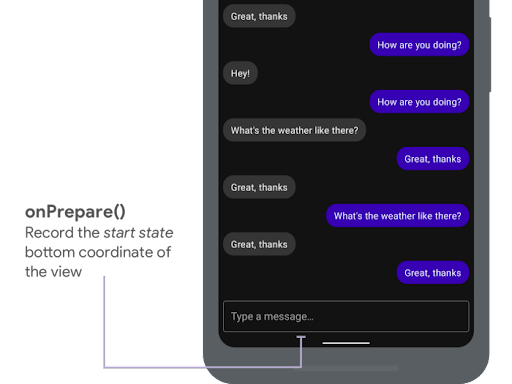
onPrepare() 사용
시작 상태를 기록합니다.
다음 스니펫은 onPrepare에 대한 샘플 호출을 보여줍니다.
Kotlin
var startBottom = 0f

override fun onPrepare(
  animation: WindowInsetsAnimationCompat
) {
  startBottom = view.bottom.toFloat()
}
자바
float startBottom;

@Override
public void onPrepare(
    @NonNull WindowInsetsAnimationCompat animation
) {
  startBottom = view.getBottom();
}
onStart는 인셋 애니메이션이 시작되면 호출됩니다. 이를 사용하여
뷰 속성이 레이아웃 변경의 최종 상태에 해당합니다. 계정이 있는 경우
OnApplyWindowInsetsListener 콜백이 뷰 중 하나로 설정되어 있다면 이미
이 시점에서 호출됩니다. 이제 뷰의 최종 상태를 저장하는 것이 좋습니다.
속성
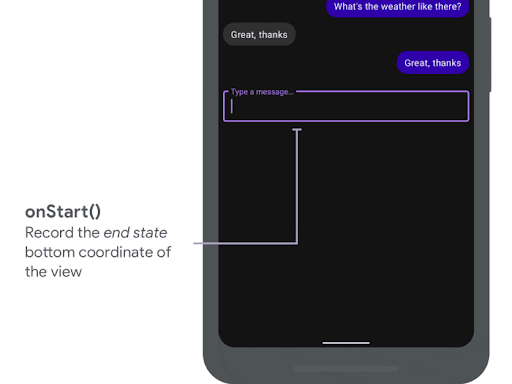
onStart()를 사용하여 녹화
확인할 수 있습니다
다음 스니펫은 onStart에 대한 샘플 호출을 보여줍니다.
Kotlin
var endBottom = 0f

override fun onStart(
  animation: WindowInsetsAnimationCompat,
  bounds: WindowInsetsAnimationCompat.BoundsCompat
): WindowInsetsAnimationCompat.BoundsCompat {
  // Record the position of the view after the IME transition.
  endBottom = view.bottom.toFloat()

  return bounds
}
자바
float endBottom;

@NonNull
@Override
public WindowInsetsAnimationCompat.BoundsCompat onStart(
    @NonNull WindowInsetsAnimationCompat animation,
    @NonNull WindowInsetsAnimationCompat.BoundsCompat bounds
) {
  endBottom = view.getBottom();
  return bounds;
}
애니메이션 실행의 일부로 인셋이 변경되면 onProgress가 호출됩니다.
이를 재정의하여 키보드의 모든 프레임에서 알림을 받을 수 있습니다.
애니메이션을 적용할 수 있습니다. 뷰가 애니메이션으로 표시되도록 뷰 속성 업데이트
키보드의 동기화입니다.
이 시점에서 모든 레이아웃 변경이 완료됩니다. 예를 들어
View.translationY하면 뷰가 이동할 때마다 값이 점차 감소합니다.
이 메서드가 호출되고 최종적으로 0에 도달해 원래 레이아웃 위치에 도달합니다.
onProgress() 사용
동기화해야 합니다.
다음 스니펫은 onProgress에 대한 샘플 호출을 보여줍니다.
Kotlin
override fun onProgress(
  insets: WindowInsetsCompat,
  runningAnimations: MutableList<WindowInsetsAnimationCompat>
): WindowInsetsCompat {
  // Find an IME animation.
  val imeAnimation = runningAnimations.find {
    it.typeMask and WindowInsetsCompat.Type.ime() != 0
  } ?: return insets

  // Offset the view based on the interpolated fraction of the IME animation.
  view.translationY =
    (startBottom - endBottom) * (1 - imeAnimation.interpolatedFraction)

  return insets
}
자바
@NonNull
@Override
public WindowInsetsCompat onProgress(
    @NonNull WindowInsetsCompat insets,
    @NonNull List<WindowInsetsAnimationCompat> runningAnimations
) {
  // Find an IME animation.
  WindowInsetsAnimationCompat imeAnimation = null;
  for (WindowInsetsAnimationCompat animation : runningAnimations) {
    if ((animation.getTypeMask() & WindowInsetsCompat.Type.ime()) != 0) {
      imeAnimation = animation;
      break;
    }
  }
  if (imeAnimation != null) {
    // Offset the view based on the interpolated fraction of the IME animation.
    view.setTranslationY((startBottom - endBottom)

        *   (1 - imeAnimation.getInterpolatedFraction()));
  }
  return insets;
}
필요한 경우 onEnd를 재정의할 수 있습니다. 이 메서드는 애니메이션이 적용된 후
끝났습니다. 이 단계에서 임시 변경사항을 정리하는 것이 좋습니다.
추가 리소스
- WindowInsetsAnimation 를 참조하세요.