
每個文字欄位都要有特定類型的文字輸入,例如電子郵件地址、電話號碼或 純文字您必須為應用程式中的每個文字欄位指定輸入類型,系統才會顯示 適當的軟輸入方式,例如螢幕小鍵盤
除了提供輸入法的按鈕類型之外,您還可以指定行為,例如: 輸入法是否會提供拼字建議、將新的句子大寫,並取代 含有動作按鈕的回車按鈕,例如「完成」或「下一步」。本頁說明 再選出這些特徵
指定鍵盤類型
請一律在文字欄位中加入
android:inputType敬上
屬性加入
<EditText> 元素。

phone 輸入類型。舉例來說,如果您要透過輸入法輸入電話號碼,請使用
"phone" 值:
<EditText
    android:id="@+id/phone"
    android:layout_width="fill_parent"
    android:layout_height="wrap_content"
    android:hint="@string/phone_hint"
    android:inputType="phone" />
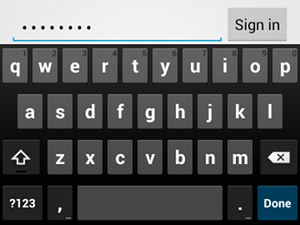
textPassword 輸入類型。如果文字欄位是輸入密碼,請使用 "textPassword" 值,因此文字欄位
隱藏使用者的輸入內容:
<EditText
    android:id="@+id/password"
    android:hint="@string/password_hint"
    android:inputType="textPassword"
    ... />
使用 android:inputType 屬性記載了幾個可能的值。
您可以結合一些值,指定輸入法的外觀
行為
啟用拼字建議和其他行為
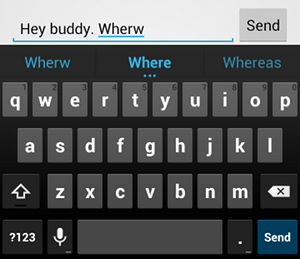
textAutoCorrect,即可為下列項目提供自動更正功能:
錯字。android:inputType 屬性可讓您指定輸入項目的各種行為。
方法。最重要的是,如果您的文字欄位適用於基本文字輸入,例如
簡訊- 使用 "textAutoCorrect" 啟用自動拼字更正功能
值。
您可將不同的行為和輸入法樣式與
android:inputType 屬性。例如,以下示範如何建立文字欄位
將句子的第一個字大寫,同時也自動更正拼字錯誤:
<EditText
    android:id="@+id/message"
    android:layout_width="wrap_content"
    android:layout_height="wrap_content"
    android:inputType=
        "textCapSentences|textAutoCorrect"
    ... />
指定輸入法動作
大多數軟輸入方式會在底部角落提供適當的使用者動作按鈕
。根據預設,系統會將這個按鈕用於「Next」或
Done (完成) 動作。除非您的文字欄位支援多行文字,例如:
android:inputType="textMultiLine":此時動作按鈕為車廂
傳回。不過,您可以指定更適合文字欄位的其他動作。
,例如 Send 或 Go。
如要指定鍵盤動作按鈕,請使用
android:imeOptions敬上
以及動作值 (例如 "actionSend" 或 "actionSearch") 的屬性。例如:

android:imeOptions="actionSend"<EditText android:id="@+id/search" android:layout_width="fill_parent" android:layout_height="wrap_content" android:hint="@string/search_hint" android:inputType="text" android:imeOptions="actionSend" />
接下來,您可以藉由定義
TextView.OnEditorActionListener
定義 EditText 元素在您的
接聽程式,回應
EditorInfo 類別,
例如
IME_ACTION_SEND,
如以下範例所示:
Kotlin
findViewById<EditText>(R.id.search).setOnEditorActionListener { v, actionId, event ->
    return@setOnEditorActionListener when (actionId) {
        EditorInfo.IME_ACTION_SEND -> {
            sendMessage()
            true
        }
        else -> false
    }
}
Java
EditText editText = (EditText) findViewById(R.id.search);
editText.setOnEditorActionListener(new OnEditorActionListener() {
    @Override
    public boolean onEditorAction(TextView v, int actionId, KeyEvent event) {
        boolean handled = false;
        if (actionId == EditorInfo.IME_ACTION_SEND) {
            sendMessage();
            handled = true;
        }
        return handled;
    }
});
提供自動完成建議
如要在使用者輸入內容時提供建議,您可以使用
已呼叫 EditText
AutoCompleteTextView。
如要實作自動完成功能,您必須指定
提供文字的 Adapter
或取得寫作建議視資料來源而定,有多種轉接程式可供使用,例如:
讀取來自資料庫或陣列的內容
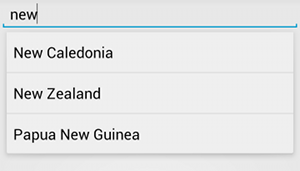
AutoCompleteTextView範例
或取得寫作建議以下程序說明如何設定 AutoCompleteTextView
會使用
ArrayAdapter:
- 在版面配置中加入
AutoCompleteTextView。以下版面配置只有文字 欄位:<?xml version="1.0" encoding="utf-8"?> <AutoCompleteTextView xmlns:android="http://schemas.android.com/apk/res/android" android:id="@+id/autocomplete_country" android:layout_width="fill_parent" android:layout_height="wrap_content" />
- 定義包含所有文字建議的陣列。舉例來說
國家/地區名稱陣列:
<?xml version="1.0" encoding="utf-8"?>
<resources>
    <string-array name="countries_array">
        <item>Afghanistan</item>
        <item>Albania</item>
        <item>Algeria</item>
        <item>American Samoa</item>
        <item>Andorra</item>
        <item>Angola</item>
        <item>Anguilla</item>
        <item>Antarctica</item>
        ...
    </string-array>
</resources>
- 在你的
Activity或Fragment,請使用以下程式碼 指定提供建議的轉接程式:Kotlin
// Get a reference to the AutoCompleteTextView in the layout.
val textView = findViewById(R.id.autocomplete_country) as AutoCompleteTextView
// Get the string array.
val countries: Array<out String> = resources.getStringArray(R.array.countries_array)
// Create the adapter and set it to the AutoCompleteTextView.
ArrayAdapter<String>(this, android.R.layout.simple_list_item_1, countries).also { adapter ->
    textView.setAdapter(adapter)
}
Java
// Get a reference to the AutoCompleteTextView in the layout.
AutoCompleteTextView textView = (AutoCompleteTextView) findViewById(R.id.autocomplete_country);
// Get the string array.
String[] countries = getResources().getStringArray(R.array.countries_array);
// Create the adapter and set it to the AutoCompleteTextView.
ArrayAdapter<String> adapter =
        new ArrayAdapter<String>(this, android.R.layout.simple_list_item_1, countries);
textView.setAdapter(adapter);
在上述範例中,新的
ArrayAdapter會初始化,以繫結至 將countries_array字串陣列轉換成TextViewsimple_list_item_1版面配置。這是 Android 提供的版面配置, 清單中的文字外觀。 -
呼叫,將轉接器指派給
AutoCompleteTextViewsetAdapter()。