The steps below can be done if you see multiple “synchronization errors” due to adding a shared calendar to Outlook on a Windows computer.
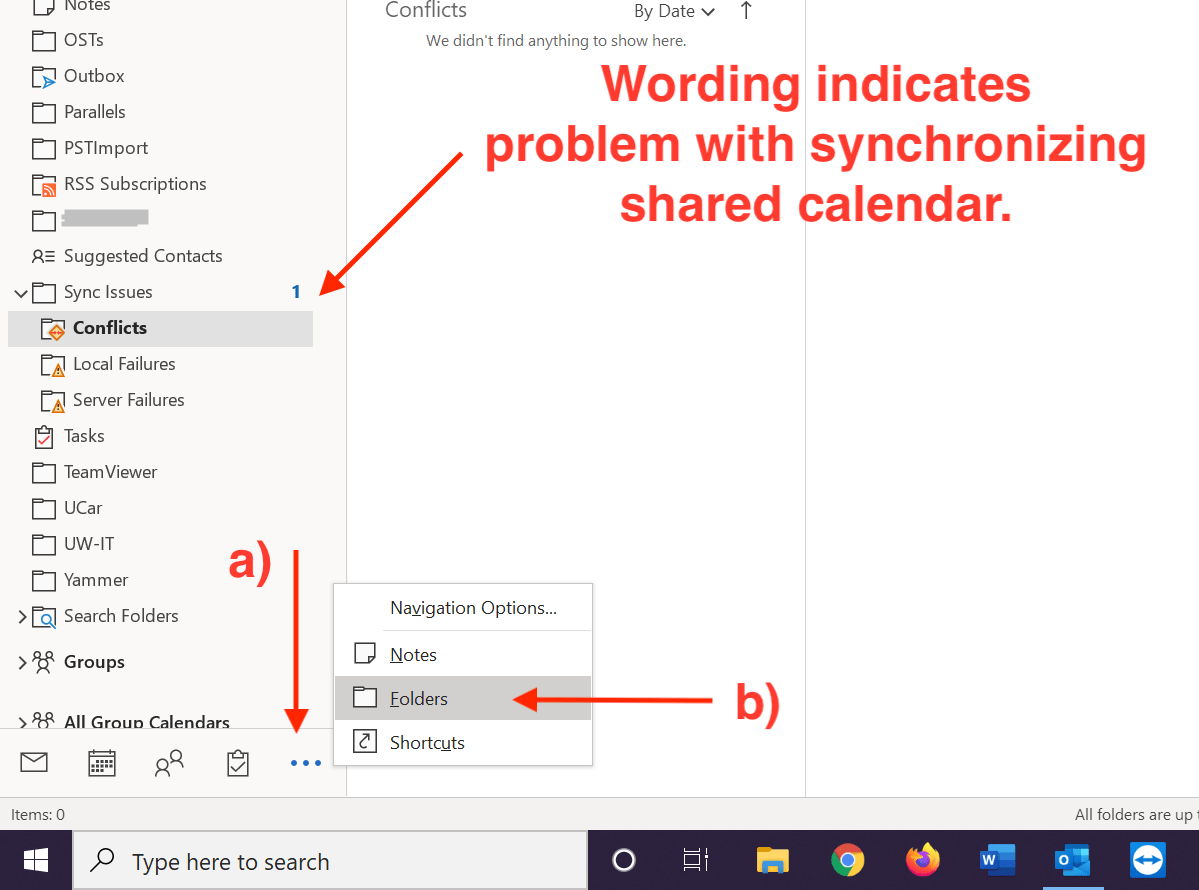
“Synchronization errors” found in the “Sync Issues” folder:
will indicate some wording about:
“Synchronizing server changes in folder ‘Colleague Name – Calendar’ Downloading from server ‘https://outlook.office365.com/’ Error synchronizing folder [80070005-508-80070005-560] You do not have sufficient permission to perform this operation on this object. See the folder contact or your system administrator”
Steps to take to attempt to resolve this issue:
1) Quit Outlook.
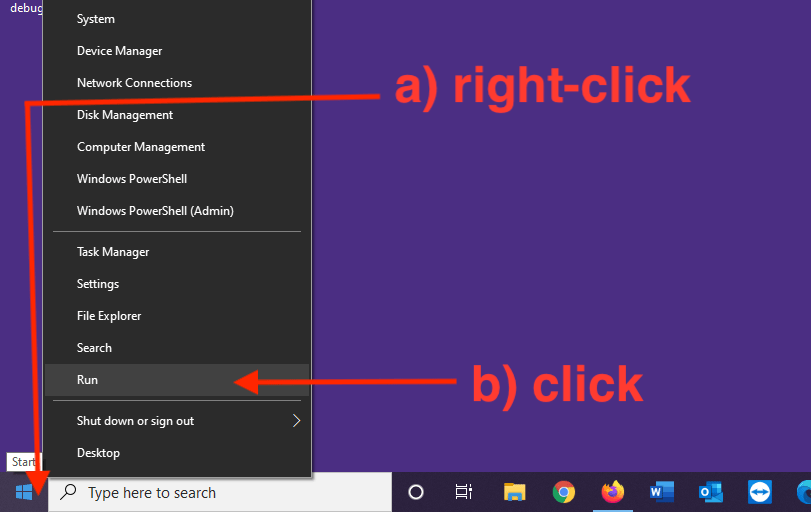
2) Right-click the lower-left Windows Start icon, click Run.
3) In the “Open:” field of the “Run” window, type:
Outlook.exe /resetnavpane
click OK.
4) Outlook will open. Let Outlook remain open for a while; 20, 30 seconds. Quit Outlook.
5) Right-click the lower-left Windows Start icon, click Run.
6) In the “Open:” field of the “Run” window, type:
Outlook.exe /cleanviews
click OK.
7) Outlook will open. The synchronization errors should clear up.
This page includes detailed directions to add a supplemental, Shared NetID email account to Outlook. The following directions assume you have permissions to access a Shared NetID’s email account. If you need permissions to access a Shared NetID’s email account contact the iSchool IT Help Desk.
5. You should receive a “successful” message. Quit Outlook, wait a few seconds, start Outlook.
6. The Shared NetID email account will be added to Outlook. You should receive emails to the Shared NetID email account. You should be able to send emails from the Shared NetID email account.
Windows – New Outlook (These directions apply to what Microsoft calls “New Outlook.”)
1. Scroll down the folder list to the “Shared with me” folder.
2. “Expand” the Shared with me folder to see and use shared email accounts you have access to. If you do not see any shared email accounts see step 3.
3. Right-click the Shared with me folder. Click Add shared folder or mailbox. Type in the Shared NetID email address ([email protected] is used as an example). Click Add.
macOS – New Outlook (These directions apply to what Microsoft calls “New Outlook.”)
1. In the Outlook application, click File, mouse-over Open, click Shared Mailbox….
2. Type in the Shared NetID email address ([email protected] is used as an example). Click Add.
3. After a few seconds the Shared NetID email account should appear in Outlook. You should receive emails to the Shared NetID email account. You should be able to send emails from the Shared NetID email account.
Outlook on the web (formerly “Outlook Web App”)
There are two ways to add a shared mailbox. One of which will open the mailbox in a new window and keep and its specific settings (categories/tags). And the other way opens the mailbox within your account, preserving your personal settings.
To open a mailbox in your account, preserving your personal settings:
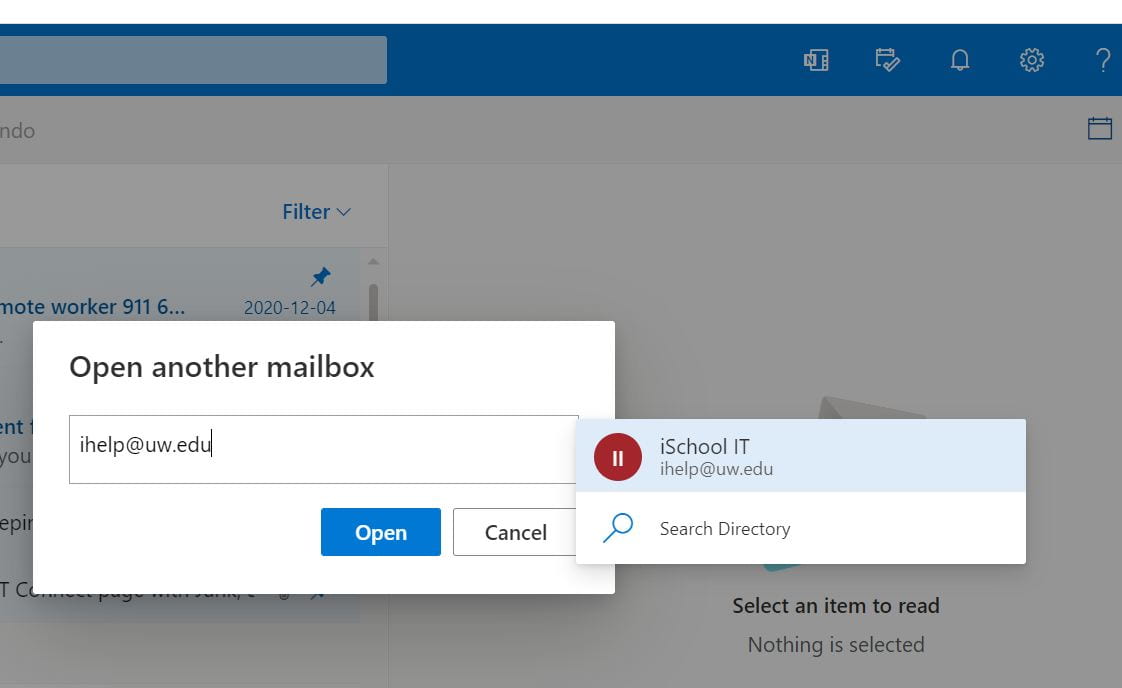
2. Right-click the word Folders, click Add shared folder or mailbox.
3. Search for the Shared NetID email address ([email protected] is used as an example), click Open.
4. The Shared NetID mailbox will be available on the left as a new account as in the image below. You should receive emails to the Shared NetID email account. You should be able to send emails from the Shared NetID email account.
To open another mailbox, preserving its specific settings:
If you are using an iSchool-issued Windows laptop and continually seeing a pop-up message, with the wording “Either there is no default mail client or the current mail client cannot fulfill the messaging request. Please run Microsoft Outlook and set it as the default mail client.”, follow the steps below:
1) Quit Outlook.
2) If you are off campus, connect to the Husky OnNet VPN by following these steps:
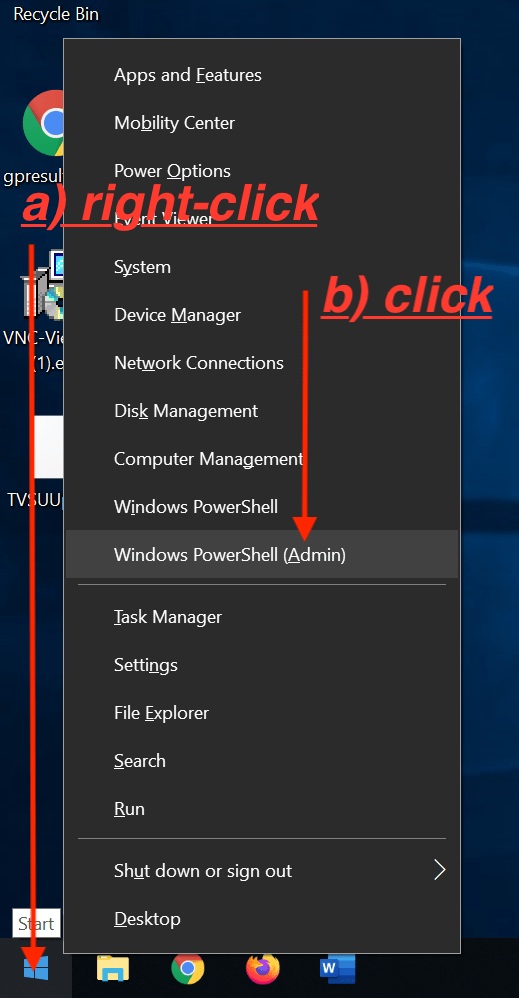
3) Right-click the lower-left Windows icon, click Windows PowerShell (Admin), click Yes.
4) In the “PowerShell” application window that opens, type:
gpupdate /force
press “Enter” on your keyboard
after a few seconds, you should see wording indicating “Computer Policy” and “User Policy” updated successfully.
If you see wording that the “Computer Policy” and “User Policy” updated successfully, the Outlook “…no default mail client…” message should stop appearing.
Microsoft introduced “Focused Inbox” for Outlook. The idea of “Focused Inbox”, is that Outlook will “learn” to automatically sort emails into two “tabs” in your inbox: “Focused” and “Other.” “Important” emails will be sorted into the “Focused” tab of your Inbox. Less important emails will be sorted into the “Other” tab of your Inbox.
Full documentation about Focused Inbox can be found at the link below:
Sorting email into folders automatically can be a huge time saver and can keep you focused on the messages that demand your immediate attention. You can create rules to let Outlook or OWA (Outlook Web App) sort them into the folder of your choice. Rules can sort messages based on the sender, the subject, the recipient or a combination of various characteristics. When you are creating a rule for Outlook, make sure that:
RULES
If you have a UW Spam Gauge rule applied, always move the Spam rule to the top of your list of rules so that it is processed first;
All your rules are server-side unless you are creating rules for client only actions, such as coloring your emails or otherwise personalizing your email. You can make your rules on OWA to ensure it’s server-side.
Here is an article from Microsoft about how to make rules in Outlook:
Sometimes we delete things accidentally and sometimes we even empty the Deleted Items folder before we figure out what we did. Fortunately, if you realize what you have done within a few days, there is a recourse.
Before you proceed, note that by default everyone at the iSchool (and everyone else at the UW that uses the UW Microsoft 365/Office 365 service) can already see the default free/busy info of everyone else. This means people can already see when you are free, when you are busy, what your working hours are and when you are out of the office.
“Advanced” sharing options are possible, for example, if you want to give someone access to more details, if you want to give someone outside of the UW a view to your calendar, or if you want to give someone “delegate” (edit) rights to your calendar.
It is recommended that you configure “advanced” sharing options using the Outlook Web App. Detailed directions from Microsoft are available on this web page:
iSchool IT recommends following the steps in the “Enable” and “Maintain” sections of the web page linked above.
Even after configuring settings as recommended on the web page linked above, it is still possible for spam and phishing emails to make it to your inbox. When you do receive suspicious emails, follow the guidance in the “What you can do” section of this web page:
iSchool faculty, staff, and PhD students have access to several, physical rooms, for meeting purposes. Some rooms have Exchange Mailboxes and Calendars. Said rooms can be scheduled/reserved directly via an Outlook Meeting Request, similar to scheduling a meeting with a person.
.
A list of rooms and information about the rooms can be found on this webpage:
01) Click the arrow button next to New Email, click Meeting. (“1” in the screenshot below)
02) Click Meeting. (“2” in the screenshot below)
03) Click Required. (“3” in the screenshot below)
04) Search for the room you want to reserve/schedule. The most accurate way to search for a room is by using either the email address or the “display name” from the list above. (“4” in the screenshot below)
05) Add the room you wish to schedule/reserve to “Required“; double-click the room from the list or click “Required”. Click OK. (“5” in the screenshot below)
06) Click Scheduling Assistant to see when the room is available, add other attendees’ NetIDs as necessary, and adjust meeting times.
07) Click Appointment, add meeting information as necessary, click Send.
All attendees will receive the meeting request including the room itself. The request for the room will be accepted or rejected based on room availability.
macOS, Outlook
01) Click New Items, click Meeting.
02) In To: field, the most accurate way to search for a room is using either the email address or the “display name” from the list above. Select the desired room.
03) Click Scheduling to see when the room is available and adjust meeting times.
04) Click Appointment, add other attendees’ NetIDs in the To: field as necessary, click Send.
All attendees will receive the meeting request including the room itself. The request for the room will be accepted or rejected based on room availability.
Outlook Web App
1) Sign into the Outlook Web App, use your @uw.edu email address and UW NetID credentials when prompted.
2) Click the Calendar icon in the bottom-left corner.
3) Click New event.
4) In the Invite attendees field, add desired room using email address from the list above. Add other @uw.edu email addresses as necessary. Use the Scheduling Assistant to confirm all attendees, including the room itself, are available. Click Send once all other meeting details are finalized.
All attendees will receive the meeting request including the room itself. The request for the room will be accepted or rejected based on room availability.
If you have any questions after reading this article or if you need any help, please don't hesitate to contact the iSchool IT Help Desk.
https://ischool.uw.edu/help
(206) 616-3086


 Calendar with others at the UW and with External Users")


