10 Levels of Ice Sculpture: Easy to Complex
Released on 12/03/2019
My name is Shintaro Okamoto, I'm an ice sculptor.
Today I've been challenged to create an ice sculpture
in 10 levels of increasing complexity.
[power tools whirring] [intense music]
So today we're making three sculptures.
First with hand tools only.
Then with power tools.
And then lastly with use of computers and CNC.
Angelfish has been kind of historical design
within the ice sculpture community.
And it's something that I think is familiar
of shape enough and interesting shape enough
to really kind of expand into.
So the concept of sculpting intself, will remain constant.
Removing the excess material around the design.
Refining the dimensional shape.
And then finishing with details.
This can be approached in many different ways.
For this project, I just simply wanted to break it
in terms of the lineage of technology.
Now this is a fish mold,
and this is not what we'll be making today.
[crunching]
[people laughing]
But first we gotta talk about the material, the ice.
Now we make our own ice.
Each machine makes two blocks, each block about 37 gallons.
Takes about three days, about 275 pounds.
And it creates a crystal clear density frozen block of ice.
Crystal clear blocks are made with two important processes.
One is one direction freezing.
That freezes from bottom up.
By freezing ice one direction,
it allows air bubbles to lift up to the surface.
And also circulation of water as it freezes.
So by agitating the water,
it releases any kind of still air bubbles
or impurities that may remain on the surface as it freezes.
First, sculpture with just hand tools.
It's the most traditional approach to ice carving.
For us, we'll start with a block of ice,
have a design at hand, study the design,
and then we will literally kind of draw the design
onto the ice surface usually with an ice pick
or a little hand saw.
So once the design is established onto the surface
of the block, then the first tool with the hand
would be the big hand saw.
It's an awesome tool, it's beautiful.
And it's a bitch to work with.
[sawing]
So hand saw is a beast of a saw, but the design,
it has to be pretty basic, pretty simple.
Straight lines, you can't really carve away
in any kind of curvature.
This is really meant to take away big chunks of ice
in a series of straight lines.
So once the big saw is used to take away
any just excess ice, the next level would be
to pick up the big flat chisels to take away more ice,
but in a slightly more nuanced manner.
Bigger the chisel, the more surface it can take away.
So as we're trying to still define the outer contour
of the shape, bigger chisel, the more helpful it is.
To work with the flat chisel, you first have to have
a basic knowledge of a chisel.
Our chisel has a beveled front and a flat back.
And the use of two sides will give us two different effects,
creating a form that's concave or convex.
And by having those two together,
we can kind of follow any kind of contours
that we're trying to achieve.
So after the big tools are gone, the next level would be
to pick up the smaller tools like small pistol saws
to hand saws
to smaller chisels.
It allows us to refine the overall shape more.
And then go into detailing like carving out eyes or scales.
As we enter the refining detailing stage,
we just have to be aware of just being more delicate
with our pressure onto the surfaces of the ice.
Everything's getting thinner and more refined,
so the tools just naturally becomes smaller.
So once the overall shape of the Angelfish is ready,
then I would pick up the V-chisel to finish the detailing.
So the V-chisels eats onto the surface of the ice
and you can really scribe onto the surface
and give a deep line onto the surface,
that can really add refraction when looked at
and lasts longer onto the surface of the ice.
With smaller chisels we can hone down into parts
of the design, like for this Angelfish,
lifting the pectoral fins perhaps,
or the bulge around the eyes.
It allows us to more easily access that area
without damaging other areas.
We often have to adjust the design we're carving
based on the limitation of the tools we use.
So for a hand tools only approach,
the design would have to be stylized
and then simplified to make the best of what we got.
Once the sculpture is finished with all the carving details,
the rest is just cleaning up for presentation.
Look at that, I haven't done that since I was 15.
Second sculpture with power tools.
In the most basic level of sculpting,
you are given the material and work within the material.
To step up that level,
then we wanna think outside the frame.
So we can bring in more materials and then fusing blocks
onto the surface to make sculpture bigger
than the actual block that we were first given.
By having the opportunity to add ice,
it allows us to compose a more dynamic design,
and allows us to play with more details.
So fusing block entails the use of aluminum plate,
a heating plate to clean up all the surfaces
that two ice will come together, so it's a perfect match.
At minimum, one of the two ice has to be very cold
to bite onto the ice surface.
[gasping]
You know, ice behaves very differently
in nuance gradations of temperature.
When it's really, really cold, fusing of blocks of ice
with a squirt of water alone doesn't work.
So you have to create channels
for the water to go into to spread.
And then when it's really, really warm,
then you have to think about the use of dry ice.
And it's a tricky, tricky thing.
So now that we have the block form ready for cutting,
we will pick up an electric chainsaw
to cut the overall shape.
[chainsaw whirring]
So while the big saws limit to straight lines,
electric chainsaws allows us to really work
various contours of various shapes.
And being a very powerful tool, it really allows us
to more efficiently tackle bigger ice
with out taxing ourselves too much.
So the use of chainsaw really gives us
a step up in efficiency.
Just one chainsaw can pretty much take over
everything that a big saw and a big chisel
would have done in a hand tool stage.
[power tools whirring]
Chainsaw itself is slightly modified to cut ice.
The chain that come off the shelf is designed to cut wood.
It's got kickback teeth on it that prevents us
from cutting ice as well as we would like.
After the chainsaw work is done,
the overall shape is pretty much there.
I would say no matter how big or small the design,
we would probably do about 60,
70% of the sculpture with chainsaw only.
So now that the chainsaw part is done,
then we will really jump into level of detailing
that we can play with, and that's done with die grinders
and specialized bits.
In comparison to hand tool only stage,
the use of die grinders really allows us to give
very refined, minute detailing of the shapes
and effects that we wanna give to the surfaces.
It's a very smooth volume that we can create,
and even the nuance curvature of the overall shape
can be really achieved by playing with these shaper bits.
[grinding]
And then from there, I'll probably pick up the needle bits
to really start drawing the scales.
And even this compared to V-chisels,
that's again, still more of a series of straight lines.
We can really start giving curves of scales
or play with different angles of the bits
going into the ice surface so that it looks
like it's layering of scales,
not just sitting next to each other.
Proficiencies of the needle bits can really deepen
the explorations of the detailings you can give.
And I'll probably do some finishing touches
with bubble bits, maybe use that to create
a nice kind of a bulby eyeballs of the fish.
I can give a nice little finish.
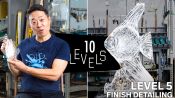
Next we're gonna really explore
the most complex design possible,
thanks to the use of computers and CNC robots.
The CNC robot consists for this sculpture, a flat bed
with spindle that's attached to a CNC contraption
which has X, Y, and Z axes that will correspond
to different data that comes from the drawing
that's done on the computer.
The carving process will be done inside a freezer now,
because CNC machine exists inside the freezer.
Everything that works with the machine
has to be very stable, and ice must remain stable
and thus the freezer work.
And for each level, I've designated different size of bits
that can range from a half inch bit for the outer shape,
all the way down to 1/16th of a bit.
[drilling]
You know, by having the numbers,
the precision to our arsenal, it allows us to create
a form that's really daring and give kind of details
that's just not possible by hand.
[blowing]
I wanna design a skeletal structure,
and then piece it together with several blocks of ice
so that we can give more dynamic overall design
to the shape, more backgrounds, more foregrounds,
maybe really expand the narrative
of the overall compositions.
Maybe dimensional bubbles that could be coming out
from the sculpture, maybe give a little coral structure
in the front, really just deepen the complexity
of the overall sculpture.
We can go further into technology.
There are 3D carving machines out there.
There are arms that create various automated structures now
that can finish sculpture completely
without us touching it at all.
But that's a whole another realm of programming.
For us, the use of CNC robot is as far as we take it.
People often ask if it's sad for us to see the sculptures
that we create, that we'd spend amounts of time
and material to do, simply to melt away.
But for us, I think as a practicing artist,
working with ice is quite liberating.
So it allows us to focus on the process itself,
and also, we see ice sculpture as more of a formative.
The finishing peak is really when it leaves our studio
and it's out and melting.
Thank you Wired!
[intense music]
Starring: Shintaro Okamoto

16 Levels of Piano Composition: Easy to Complex
21 Levels of Skateboarding: Easy to Complex

6 Levels of Knife Making: Easy to Complex

11 Levels of Origami: Easy to Complex
10 Levels of Ice Sculpture: Easy to Complex

13 Levels of Beatboxing: Easy to Complex

11 Levels of Self-Portraiture: Easy to Complex

26 Levels of Yo-Yo Tricks: Easy to Complex

22 Levels of Cardistry: Easy to Complex

24 Levels of Balisong Flipping: Easy to Complex

13 Levels of Pumpkin Carving: Easy to Complex

21 Levels of Dunking: Easy to Complex

15 Levels of Pool: Easy to Complex

12 Levels of Graffiti: Easy to Complex

15 Levels of Turntablism: Easy to Complex

11 Levels of Prosthetic Makeup: Easy to Complex

Levels of Knot Tying: Easy to Complex

13 Levels of Drumming: Easy to Complex

21 Levels of Pen Spinning: Easy to Complex
21 Levels of Ballet: Easy to Complex

25 Levels of Freestyle Soccer: Easy to Complex

9 Levels of Pickpocketing: Easy to Complex

11 Levels of Holiday Gift Wrapping: Easy to Complex


