Creating Guru Cards from Slack
Guru's app for Slack helps you ensure your team's trusted information lives where it can be surfaced, with or without searching. Learn how Collection owners and authors can create new Guru Cards or add to existing Guru Cards while viewing direct messages and threads in Slack.
Tip
Enable Trending Topics in Slack to start identifying gaps in your knowledge base by surfacing trends in designated Slack channels (hint: a #product-questions channel is a great place to start). Then, use Assist to speed up the process of summarizing and capturing that knowledge. Assist can be applied while creating Slack direct messages and threads into Guru Cards.
Create Guru Cards while working in Slack
- Ensure that the Guru app is added to the Slack channel by typing
/invite @guru\ - As a Guru Collection owner or author, click on the three ellipses (“⋮") on the upper right-hand corner of any Slack message to open the More actions menu.
- If you don't see the Guru-related shortcuts at the bottom of the More actions menu, click More message shortcuts... and search for "Create Card".
- Select Create Card.
- Enter a Card title. If you have added the Guru app to the channel, you can select if you would like to create a Card from that message of the entire thread from the Create Card from dropdown at the top-right.
- Card content automatically pulls in the message or thread content. Determine what content you'd like to include in your Card and edit as you'd like.
- All-in-one and Enterprise plans: Click the horizontal ellipses ("⋯") to the right of ⚡️Assist. Choose to Summarize text or Convert text to FAQ format. If you're creating a Card out of a trending topic, you'll see the additional option to extract all text from every relevant Slack message into the Card.
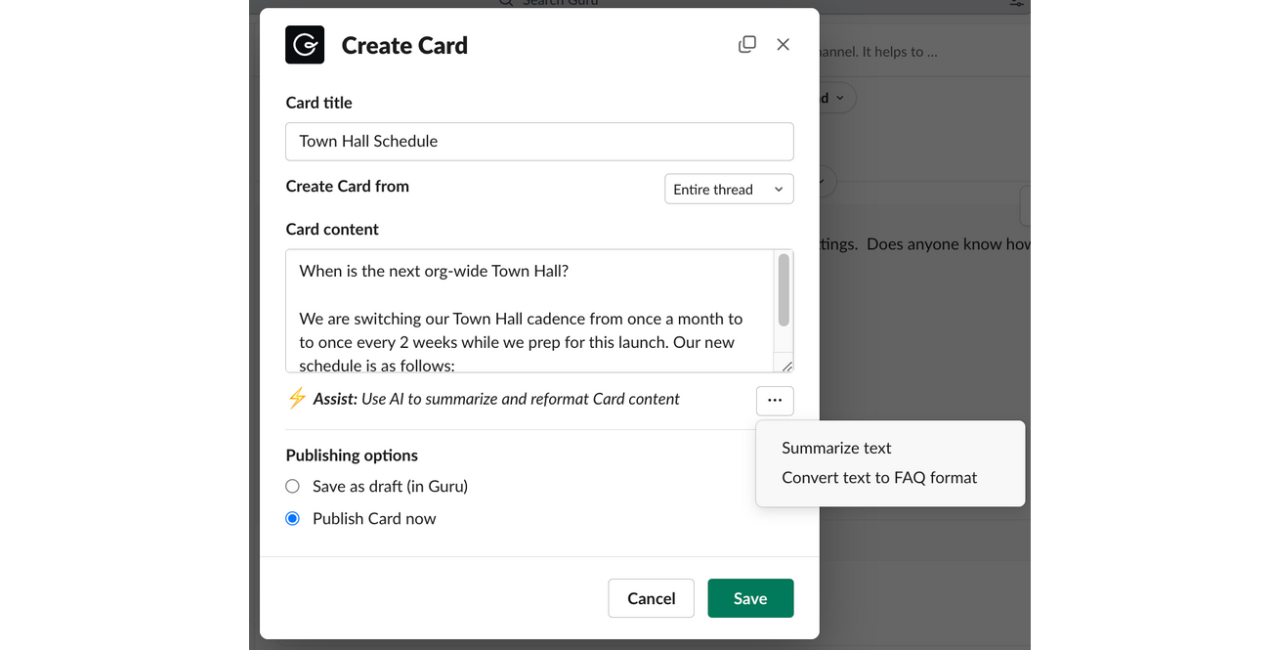
- Under Publishing Options, select Save as Draft (in Guru) if you'd prefer to revisit in the web app or extension before publishing. Otherwise, select Publish Card now and hit Save.
- After opting to Publish Card now, the Guru Slackbot will prompt you to select the Collection you'd like to add the Card to. Click Next to proceed or click Cancel to abort publishing the Card. A draft Card will not be saved when publishing is canceled at this stage.
- Finally, select the Verifier and Verification interval. You can also assign the Card to a folder, create a new folder, add tags, or create a new tag. Click Save to proceed or click Cancel to abort publishing the Card. A draft Card will not be saved when publishing is canceled at this stage.
- Your newly published Card is linked in a threaded, automated Guru Slackbot reply with the options to View Card or Open Card in Guru.
Note
- If you answer a question in Slack by creating a new Card via the Guru Slackbot, the Card's assigned verifier will automatically be you.
- The timeline for verification is set to every 3 months by default.
- Images or files cannot be pulled from Slack messages into Guru Cards. This is an example of Product Feedback we'd like to receive in the Guru Community.
Add to an existing Guru Card in Slack
- Click on the three ellipses (“⋮") on the upper right-hand corner of any Slack message containing a linked Guru Card to open the More actions menu.
- If you don't see the Guru-related shortcuts at the bottom of the More actions menu, click More message shortcuts... and search for "Add to existing Card".
- Locate the Card you'd like to add content to and select Add to this Card.

- Below the option to View Card or Open Card in Guru, the text content of the original selected Slack message appears for editing. Note: the contents of this text box will be added to the bottom of the selected Card.
- Under Publishing options, select Save as Draft (in Guru) if you'd prefer to revisit in the web app or browser extension before publishing. Otherwise, select Publish Card now and hit Save.
Updated about 2 months ago