Creating Guru Cards
Cards are the fundamental, bite-sized units of knowledge in Guru. Cards are organized into folders which are further categorized into Collections within a Guru workspace. Unlike long documents, Cards are optimized to make knowledge easy to search and quickly accessible for your team when they need it. The ability to save drafts, implement edits post-publishing, and track published changes over time simplifies knowledge management.
Creating a Guru Card
-
Initiate Card Creation:
- In the Guru web app, click the "+ Create a Card" button at the top.
- In the Guru extension, click the "⨁" plus button.
-
Choose to start from scratch by selecting "Create a new Card" or use a pre-existing template.
-
Enter Card Details:
- Give the Card a title.
- Type the body of the card, adding any necessary formatting. Users on All-in-one and Enterprise plans can use the Guru's AI writing assistant, Assist, for help.
-
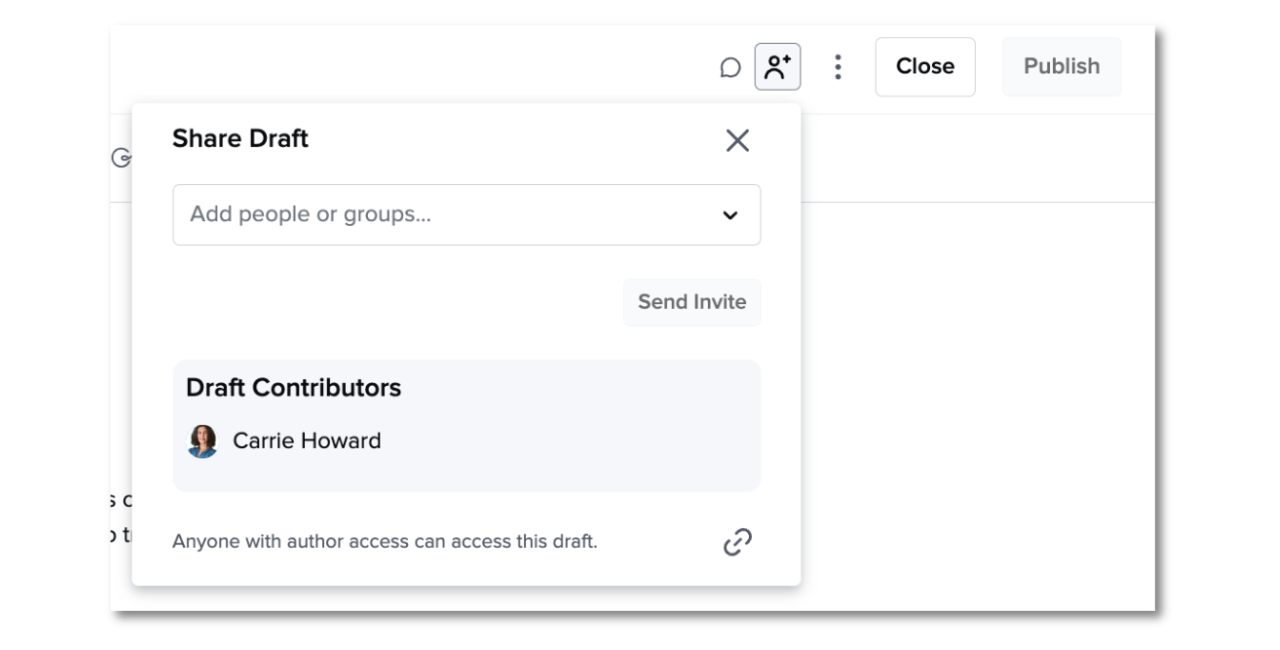
Share Draft (Optional):
To add collaborators, click the "Share Draft" icon at the top right and invite others to contribute by sending an invite. -
Select where you'd like to publish the Card:
- Select a Collection (you must have Author or Collection Owner access in the Collection you'd like to publish too).
- Pick a Folder within the chosen collection.
-
Add Tags (Optional):
Assign relevant tags to help users easily find the card through search. -
Set Verification:
- Choose a Verifier who will ensure the card remains accurate.
- Set a Verification Interval to remind the verifier to check the card's validity periodically.
-
Control Access:
Decide if you'd like to publish this Card for specific users or publicly. -
Final Steps:
- Click Next step to proceed, or Request to publish to notify the approver for review if your team uses publishing workflows.
- To discard a draft, use the ellipses "⋮" menu to select Delete draft.
- To publish, click Publish Card.
Editing an Existing Card
-
Find the Card:
Search for the card in Guru, then click the Edit Card pencil icon to open the editor. -
Edit Content:
All changes are saved automatically. The draft remains private until you add a collaborator. -
Add Collaborators (Optional):
Click the "Share Draft" icon to add collaborators. Only users and Groups who have Author access to that Card will be permitted as collaborators. -
Publishing Edits:
- Click Publish to update the card immediately.
- If you wish to have the changes reviewed first, click Request to publish and leave a note for the collection owner.
-
Manage Comments:
If there are open draft comments, resolve them before publishing to avoid losing them. -
Verify Content (If Applicable):
- If editing an unverified card, choose to verify it if needed.
- Maintain or reset the verification interval for verified cards.
-
Notify Followers (If Applicable):
If there are followers, you can choose to notify them about the updates.
Tip
Your work is consistently auto-saving if you close out of the editor. You can recover your Card drafts under the My Drafts in the left-hand navigation.
Adding collaborators to a draft Card
Multiple users can work together on the same draft Card provided they are members of a Group with author or Collection owner access to the Collection the Card is stored within in their workspace. Collaboration in a Card is like creating a document using Google Docs - you will see who else is in the draft Card and watch their edits as they happen in real-time. Highlight text and leave a comment for other collaborators. When editing published Cards, there is only one draft version of the Card. The draft of a published Card is shared, meaning, Collection owners and authors who edit the same published Card see each other's edits before publishing.
- Click the Share Draft icon ("👤") located at the top right of the Card.
- From the popover menu, search for other Collection owner and author Groups or individual users to add as contributors.
- Click Send Invite to immediately notify them of their invitation to contribute to your Card. Click the Copy Draft Link button to add the link to the draft Card to your clipboard for immediate sharing with the Collaborator you've invited.
- Collaborators can see one another's cursor and profile icon while they are working on the same draft Card. Collaborators can also leave comments associated with text in the draft version of a Card.
Accessing a Card's edit history
- Open the desired Card in Guru's web app or browser extension.
- Click the ellipses menu at the top of the Card, then click Card details.
- Here, you'll view:
- Card Created. The original author's name and the date the Card was created. This information is retained even if the user is no longer a member of your Guru team.
- Last Verified. This name of the user who last verified the Card and the date they verified it.
- Revision History. A list of every published revision to the Card during its lifetime. If you would like to compare the current Card to one of its historical edits, click Compare to: Current Version. If you'd rather see the edits made between two historical versions of the Card, click Compare to: Revision #. When viewing all changes to a Card, insertions are shown in green, while deletions are shown in red.
- Cards that link to this Card. When using Guru Card linking, the Cards containing links to the Card you are viewing will be listed here.
- Click Back to Card to return to the previous view of the Card.
Tips for creating Card content
Add high-value knowledge first
The first content you add to your workspace should be high-value knowledge that your team accesses frequently. When a user sees meaningful, up-to-date, and verified content in Guru when they first access it, it helps encourage adoption because it shows them that Guru is their single source of truth and can help them work more efficiently. It's also important to have enough content for leadership to evaluate Guru's impact.
- Examples of high-value knowledge include product FAQs, sales assets, competitor information, troubleshooting guides, and key process-oriented information.
- The most essential content should be added prior to rolling out to the workspace so that users immediately benefit from seeing search results, suggested knowledge, and Answers. In addition to yourself, we recommend inviting your subject matter experts to assist with your content curation.
- For faster content creation, check out Guru's content migration options and the generative AI feature Assist.
Create Cards with search in mind
Content should be easily searchable and discoverable by your team. The title of a Card should reflect the way a user would typically search for the information it holds.
Avoid adding duplicate information to Cards
Avoid duplication of information so you're not having to manage more than one Card covering the same contents. Note that the same Card can be viewed on multiple folders (as long as the folders are in the same Collection), and you can link Guru Cards to each other. This might mean breaking down complex topics into one sub-topic per Card. For example, if the topic of the Collection is "Product FAQs", each question and its answer could be its own Card. This allows your team to search and find just a bit of information they're looking for, rather than scrolling through a longer doc.
Create easy-to-consume Cards
Cards should be easily consumable for the user to digest and then relay to customers or other teammates. Unlike docs stored in a shared drive or another repository, Guru's Card design is ideal for surfacing the most relevant content in just a moment. Cards are more likely to be read and consumed if they are less than 1,000 words in length (which equates to a one-page doc).
Use folders to organize Cards
Structuring your content is easy to do in Guru. You can use folders to organize Cards within each Collection. Folders can be nested within folders up to three levels. You can also reposition your content and make changes at any time.
Frequently Asked Questions about publishing Cards
Are there any best practices for bulk updates? How do I "find and replace"?
When initially sizing the number of Cards to update and when updating a small number of Cards, start by searching for the keyword in the web app. Use quotation marks around the term you're looking for to perform an exact match search. Review the Cards in your search results and edit them one by one. If you have admin access and your workspace has Assist enabled, you can create a custom action to find and replace the keyword to speed up the process of editing each Card.
Another option is to perform an export of Cards using Card Manager. Open the resulting CSV file and use cmd or ctrl + f to search for the keyword and quantify the number of times it appears. Search Guru for the Card's title or use the Card ID (i.e. app.getguru.com/cards/CARD ID HERE) to navigate to each Card and make the update.
Finally, to update a large number of Cards at one time, admins with Collection owner or author access on All-in-one or Enterprise plans can use this Google Sheet for find and replace. The spreadsheet contains a script that can help you speed up the process of updating Cards using Guru's API.
Does Guru support spell check?
Yes! You can use Assist or your default web browser spell checker. The Grammarly extension will also work in Guru.
What happens when one of the collaborators in a shared draft publishes the Card?
When one of the collaborators publishes the Card, other collaborators are immediately shown a message prompting them to close the Card or edit the published Card. All comments associated with text in the draft Card are deleted.
Updated about 2 months ago